Friday, February 26, 2010
Baby Shower Guest/Gift Book
I found this REALLY cute idea from Creating Treasures Blog. Her guest book is DARLING, and very vintage, she likes things vintage, I am pretty sure you can buy it from her etsy shop. I was after an idea because I forgot to buy something for a guest book.  Anyway it turned out cute, I already had the cute little scrapbook kit, (you can get from Michaels or wherever) So I just added the cover.
 I just created a guest page and gifts page with white cardstock and some little vinyl letters from that awesome cricut!
 I ♥ the ribbon edges, it is so girlie!
Sunday, February 21, 2010
Felt Flower Tutorial
This just MIGHT be a project I can claim as my own! Woo HOO! (until someone else tells me it is theirs! But I am pretty sure I made this one up on my own! (with lots of inspiration from others)

I start with two contrasting colors of felt. I use my trusty pattern that I just free handed and cut out of card stock, one big and one small.  Then I stitch around the edge of each flower with some floss of a contrasting color. When I get back to where I started I just tie both ends together to finish it off and I like to make it pucker a little bit, I don't want my flower flat.
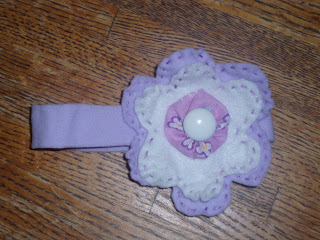
  After stitching around both flowers I either just attach a button in the middle or else make a button cover (I think that is what my mom calls them) by cutting out a circle of coordinating fabric. My pattern is a wide mouth canning lid, hey it works!: (OK at this point I realize I didn't take pictures of the purple flower, this button cover will end up on a white and purple flower not the blue that I took pictures of above, oops)
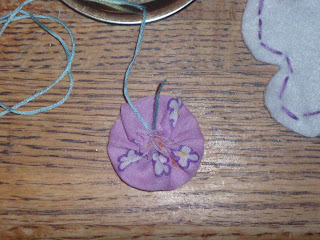
 Then I stitch big stitches around the very edge of the circle, the thread wont show, and I like to use floss for the strength, whatever thread is on your needle will work though:
 When I get to the end I pull it all together and tie the two ends tightly to make it all gather up like this:
At this point I trim all the strings and then hot glue a button to the center of the button cover and then attach the button cover to the two flowers all layered together, with a stitch or two, coming from the back of the large flower and going through to make sure I catch each layer. This makes all three layers secured together, you can even hot glue between each layer for more security. (A lot of times if a baby is not used to hair bows (and even when they are used to them), they will be yanking on it and you don't want it to come apart.) 
To attach to the hair band I like to use Velcro dots. The sticky back kind are great, but I always reinforce with hot glue. Glue the soft velcro dot to the band and the hard dot to the flower (I do this because even if there is no velcro dot on the hair band (sometimes they get ripped off by little hands) the flower will still be able to stick to the band with the more hard, coarse velcro dot on it. It can even stick right to the hair pretty well if you want. (just something I have learned)
And there you have it! Now the flowers can be inner-changed with other bands to match outfits.
Also pictured are a couple of daisies I just cut off the stems of a bouquet (from the dollar store). I take the flower apart and glue each layer together, again because babies will pull at these! Then I just attach the velcro dots, coarse dot on the flower soft on the band, and WA LA! Easy Peasy! These are all ready for a baby shower this weekend and maybe took and hour to make!
Friday, February 12, 2010
Self Binding Recieving Blanket
A couple of friends have been making these cute blankies, I had to try one for myself! 

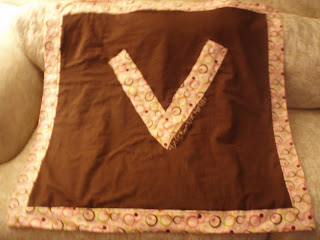
 It turned out really good and not as hard as I thought, I had good directions from Jessica. Once I started getting it together I thought wow this looks kind of familiar:
 My SIL Sara made this one for Claire, I had always wondered how she did it, now I know! I cant wait to make some more!
Thursday, February 11, 2010
Love Spray Paint!
This idea I totally stole from Moody Girl Projects, she says ALL things must be pretty, she even spray painted her Dawn soap dispenser, which looks really cool BTW. 
 I wish all things were pretty at our house.......We are getting there one thing at a time!
Monday, February 8, 2010
Teacher Gifts
The girls created their teacher gifts today after school. They turned out cute, and I am glad it was something they could do....I just helped a little!
CLAIRE
I made Claire's name in the warm summer months, but I still love them and wanted to post about them.  I just got the letters from a craft store and spray painted them white. I stapled ribbon on the back and hung them from nails. I think they would hang cute from knob too, I haven't found a good inexpensive supplier for knobs yet. I have a small collection of old door knobs but I am using them on another project.
Hair Bows GALORE
And no where to keep them! I have seen this idea all over blogland and finally got a good frame to make our own. The frame was from my favorite thrift store for 3 dollars and I painted it white, sanded the edges and then put a little stain over it.  It turned out really cute, It is really like art work for the bathroom! I didn't think we would fill it up, just enough room, I cant make anymore hair bows I guess!
Justin's bulletin Board
I am always looking for ways to display the kids art work, I cant stand a cluttered fridge, It makes me feel like the whole kitchen is cluttery....I found this bulletin board at the thrift store for $2.50. I spray painted the frame black and sanded down the edges and added his name in vinyl.  He as arranged and rearranged his things on there 20 times! I was going to just put thumb tacks but I didnt think that would work in a 4 year old BOY room. I found the clips at walmart in a pack of 4 for $1.18. They stick into the cork and then he can just clip stuff on, much more safe! I got this idea from the Pottery Barn kids magazine, I have plans to make a couple more for the girls rooms. LOVE Pottery Barn!
Emma's corner
Emma wonders why her room isn't "fancy" like Ashley's, Emma likes fairies especially tinker bell, SO we call her room the Tinker Bell room, We added a couple of butterflies to her corner $3 on the clearance isle at walmart and the cute purse lamp from the thrift store 3 dollars also.  I have plans to paint her night stand top with chalkboard paint, her room is no where complete either. Lets just hope my/her tastes don't change by the time we get it finished! I told her that her room isnt "fancy" like Ashleys because she doesnt keep it clean, do you think it will work? Not a chance!
Ashleys Room
I am trying to create a shabby chic room for Ash, it is always a work in progress, she really wants a canopy, some day we will build her one, until then this will work as her canopy. I have seen cute frames like this all over blog land, I cant say how much I LOVE my cricut to cut out the vinyl! The frame was 50 cents and gold.
Subscribe to:
Posts (Atom)


